How to Add a Breaker to a Panel
How To Install A Electrical Subpanel
If you want to add several electrical circuits to your backyard storage shed or studio shed you will need to add an electrical sub panel with circuit breakers. This allows you to have multiple circuits in the shed. You can then have separate lighting and power circuits in the shed.
Other typical reasons for adding a circuit breaker are finishing a basement or adding power to a garage. This article teaches you how to add a circuit.
Install a electrical circuit breaker sub panel when your main circuit panel is full and you need to add more circuits. Sub panels can be installed both next to the main electrical panel or close to the area you are bringing power to such as when finishing a basement, adding an addition to your home or you simply need more power in the garage.
brief how to
In this article, you will find information about:
- Install The Sub Panel Box
- Pull The Feeder Cable Between The Sub Panel and Main Electrical Panel
- Pull The Feeder Cable Into The Sub Panel
- Attach The Feeder Cable Wires To The Sub Panel
- Turn The Power Off And Verify Space For The New Double Pole Feeder Breaker
- Pull The Feeder Cable Into The Main Electrical Panel
- Attach The Feeder Cable Wires To The Main Electrical Panel
- Install The Breaker Into The Main Electrical Panel
- Install Circuits In The New Sub Panel
tools and materials
- Hammer
- Wire clamps for the feeder cable knockouts on the sub panel
- Flat head screwdriver
- Phillips head screwdriver
- 14/2 Non metallic cable for 15 amp circuit, 12/2 Non metalic cable for 20 amp circuit
- Utility knife
- Handy Boxes for outlets, switches, lights, telephone, data and smoke alarms
- Wire Stripper
- Cable sheathing stripper
step 1 Install The Sub Panel Box On The Backyard Shed Wall
Sub Panels are designed to be mounted in the wall cavity between two wall studs. When the electrical sub panel is installed in a wall cavity and the wall is covered with drywall or plywood you do not need to protect the wires with conduit. Mount the sub panel with the top of the panel box at 6' above the floor. Typically, the face of the panel extends 1/2" in front of the face of the wall studs so the drywall will be flush with the finished wall. Screw the panel into the studs using the holes on the sides of the box.
step 2 Pull The Feeder Cable Between The Sub Panel and Main Electrical Panel
Pull the feeder electric cable from the main panel to your new sub panel. Make sure that you have enough cable at each end to be able to make the connections inside the panel. TIP: To measure the length of cable needed you can use a piece of string or cord, pull it between the panels and cut it to length.
step 3 Pull The Feeder Cable Into The Sub Panel on The Storage Shed Wall.
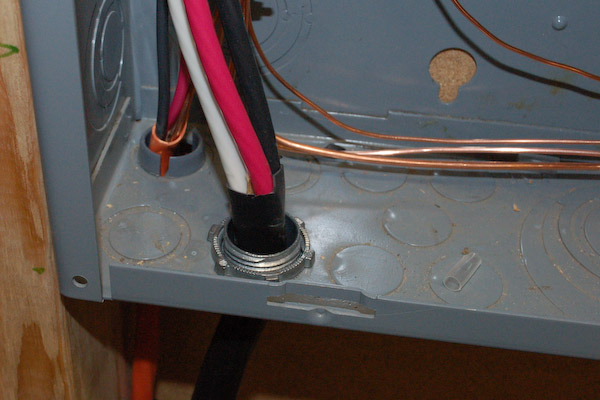
Use a screwdriver and hammer to remove a knockout on the side of the sub panel that you plan to bring the feeder cable into the box on, usually the top or bottom so the wires can go directly to the bus bars. Make sure to knock out the same size hole as the wire clamp being used to hold the wire you are using. Install the cable clamp into the knockout hole and attach it to the sub panel using the locking nut.
Pull the feeder wire into the sub panel. Be sure to leave about 2' of extra cable on each end after the feeder cable enters both the sub panel and the main electrical panel. Tighten the cable clamp screws onto the feeder cable so the cable is secure but is not crushed and the cable sheathing is not crushed.
Remove the outer sheathing from the feeder cable so that only 1/2" of sheathing extends into the sub panel. Use cable staples to attach the feeder cable to framing within 8" from where it leaves the panel and every 4' or less between the two panels.
step 4 Attach The Feeder Cable Wires To The Backyard Shed Sub Panel
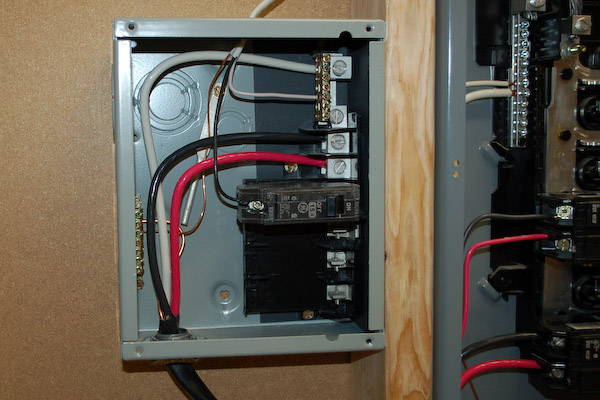
Inside the sub panel on the backyard shed wall there are 4 bus bars, a grounding bus bar, a neutral bus bar and two hot main lug bus bars. You will hook each one of the 4 feeder wires to its respective bus bar.
Neutral Wire, White: Remove 1/2" of the wire insulation from the white neutral wire and attach it to the neutral bus bar.
Ground Wire, Green Or Bare: Remove 1/2" of the wire insulation from the green ground wire and attach it to the ground bus bar.
Red Wire: Remove 1/2" of the wire insulation from the red feeder wire and attach it to the hot bus bar. (sometimes this wire is black with a red stripe on it)
Black Wire: Remove 1/2" of the wire insulation from the black feeder wire and attach it to the remaining hot bus bar.

step 5 Turn The Power Off And Verify Space For The New Double Pole Feeder Breaker
The feeder panel is the larger panel, typically on the house next to your shed.
Safety Note: Working with electricity is very dangerous and can kill you. Before working on the main electrical panel you must turn the power to it off for safety. Turn the power off by turning the main circuit breaker feeding the panel to the off position. Remove the face of the panel and double check that there is no power in the panel using a electrical tester.
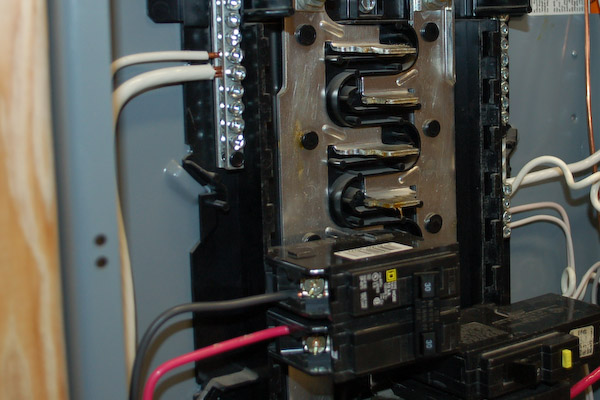
Make Sure You Have Space For The New Feeder Circuit Breaker:
The breaker in the main panel that will feed the sub panel will take up two slots in the main panel. If there is only one slot or no slots open you will need to add slots by removing the existing two single pole breakers and installing slim breakers that allow for two circuits per single slots in the panel. This will give you the extra space you need to install the double pole breaker that will feed the sub panel.

step 6 Pull The Feeder Cable Into The Main Electrical Panel
Bring the feeder cable into the main electrical panel in the same way you did the sub panel.
- Remove a knockout
- Install the cable clamp in the knockout hole
- Pull the Feeder Cable into the electrical sub panel through the cable clamp
- Tighten the cable clamp screws onto the feeder cable
- Remove the outer sheathing from the feeder cable, leave 1/2" of sheathing inside the panel.
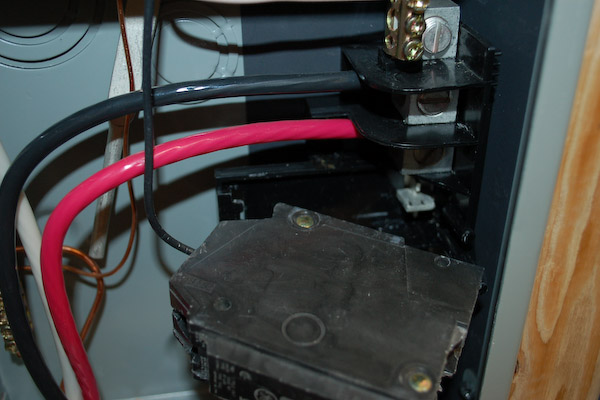
step 7 Attach The Feeder Cable Wires To The Main Electrical Panel Breaker
Neutral Wire, White: Remove 1/2" of the wire insulation from the white neutral wire and attach it to the neutral bus bar. (the bus bar that is attached to the breaker lugs)
Ground Wire, Green Or Bare: Remove 1/2" of the wire insulation from the green ground wire and attach it to the ground bus bar by installing it into one of the lugs and tightening the lug onto the wire. (the bus bar that is only attached to the metal cabinet)
Red Wire: Remove 1/2" of the wire insulation from the red feeder wire and attach it to one of the lugs on the new circuit breaker. (sometimes this wire is black with a red stripe on it)
Black Wire: Remove 1/2" of the wire insulation from the black feeder wire and attach it to the remaining lug on the new circuit breaker.
step 8 Install The Breaker Into The Main Electrical Panel
Install the new feeder breaker into the main electrical panel by hooking the tabs on the bottom of the breaker onto the lip in the panel and pressing the other end of the breaker onto the bus bar. Before installing the panels cover you may need to remove a face plate knock out so the breaker will fit thru the face of the cover. Make sure the new breaker is in the off position and replace the cover by screwing it on.
Turn the main breaker that feeds the main electrical panel on but leave the new feeder breaker off until you are finished working on the electrical sub panel in the backyard shed.
step 9 Install Circuits In The New Sub Panel
You are now ready to pull circuits into the Sub Panel in the backyard shed. You can learn about adding circuits by reading the article How To Add A New Circuit.
related articles
- How To Install Electrical Wiring In A Basement
- How To Add A New Circuit
How to Add a Breaker to a Panel
Source: https://www.icreatables.com/how-to-build-shed/electrical/sub-panel-installing-electrical